.jpeg)
4 steps that will optimize the design of your business application in PowerApps all the while maximizing its impact.

In the past, applications were designed based on business requirements, which were then converted into data models, from which data-entry forms were created for users. The arrival of Canvas apps in PowerApps has made creating and tailoring applications to meet user needs easier than ever before. Modern day users have higher expectations of efficiency. They have access to a multitude of simple solutions, and their needs are met almost instantly. In this context, entering data can seem like a waste of valuable time for users as well as for the company. Either way, your company needs this data to make important decisions. How can you simplify your solution to maximize its impact and how can you reflect only the essential daily user activities? Here are 4 steps that will optimize the design of your application on Canvas apps in PowerApps all the while maximizing its impact on users:
Step 1 - What challenge does your business face and where does it stem from?
Is it that your salespeople are often on the road and rarely take the time to enter customer information into your CRM? Whatever it may be, you must first try to pinpoint your business challenge. You can then try to understand where the problem stems from, by observing the steps that the users need to take.
Questions to be addressed:
- Are there too many steps and passwords required to access the platform?
- Are there too many questions or fields to fill in with respect to the essential information?
- Should some fields be optional for some departments?
The example of our time sheet:
As a company that provides professional services, ensuring that our employees complete their time sheets on a daily basis is a constant challenge. Nevertheless, we must know the hours they have spent on each project in order to make informed decisions.
Let us take a look at the steps our employees must follow to complete their time sheet:
1- Log in to Dynamics 365, the CRM solution used by our company2- Navigate to the correct menu3- Select the data entry form for time sheets4- Enter the required data (project selection, task, type of hours, duration, description)
Are there any steps that could be simplified?
Step 2 - Listen to your future users
Once the problem has been identified, you must speak with the users. Gather a sample of opinions by gathering and interviewing different users. Be sure to include the users who perform well as well as the ones who are often late in entering data.
Questions to be addressed:
- What is useful for them?
- What should fall within the 80/20 concept?
- How can they enter their data while on the road?
- Be open-minded regarding other comments
The example of our time sheet:
On one hand, our company needs time sheet data to manage invoicing, assignments and projects. On the other hand, users face the relative business difficulty of “recording” this data. We therefore interviewed some of our employees to better understand their issues.
Step 3 - Quickly create a prototype with the least entries possible
A PowerApps Canvas app is a particularly interesting tool when combined with simple choices. In other words, limit text entry to those areas where it is really needed. Be sure to guide the user through the choices, page by page. Do not try to merge all the information on a single screen.
Avoid:
- Drop-downs (drop-down menus)
- Drop-down lists (combo boxes)
- Any other option oriented towards computer input
The example of our time sheet:
After consulting our sample, we created a mobile application to better meet the needs of our employees that are on the road. This one was built from the existing system (PSA for CRM).
Step 4 - Gather feedback and adapt continuously
It is essential that you stay connected to the reality of users. By establishing means of communication, you will be able to receive feedback regarding the application on a regular basis.Adjusting the application as often as possible, will increase the sense of ownership of your users and subsequently increase the level of adoption.
The example of our time sheet:
In order to allow users to discuss the application, submit new ideas and follow up on problems encountered, we have set up a Teams channel dedicated for this purpose.
This does not mean that Canvas apps is magical
Of course, using Canvas apps is not the same as a direct passport to an application design that will inevitably meet your needs. It all depends on how you proceed. You can use the two following approaches to designing a Canvas application as an example. This, of course, with the example of our time sheet! You will see that the first is built on basic Microsoft models while the second was designed following the 4-step approach we just saw. Basic Microsoft model Model built following the 4-step approach we just saw.

Introduction (Splashscreen)
- Consider allowing your users to customize their user experience (choice of colours)

View of the list
- Delete the employee selection (we already know who is connected)
- Use the calendar navigation bar instead of the drop-down menu


Review Screen
- Avoid having the additional step of a view only screen; give the possibility of making immediate changes.
- Only provide the modifiable information in the modification screen (project, date, time type not shown on this screen for example

Data entry screen [part 1]
- Do not recreate the “PC” experience, avoid drop-down menus
- Use additional screens or steps if this makes it easier to present and select options
- For instance, the first step that must be confirmed by users, is the type of project and the hours they spent working on that project.

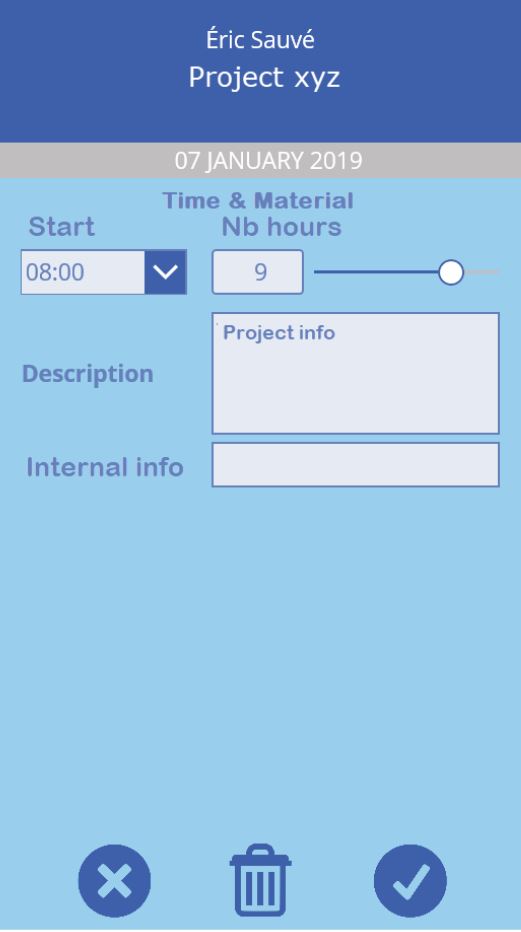
Data entry [part 2]
- Navigate within the calendar
- Easy selection list with a vertical gallery for project elements
- Displays only the field when a choice is required [here, for example, the time type is missing because only one choice is available.
- Default value for start times/nb
- Offer slider for the number of hours

User Adoption (again and again!)
Direct your design process towards user adoption. If you don’t hear “wow” when you deploy your application, go back to the drawing board and go through the steps with your users. Keep in mind that the user community is often mobile, and their time is limited. You must allow them to quickly and efficiently resolve a business difficulty that will bring a gain to your company. Contact our experts to learn more about the new interface and how you can prepare for this change. Stay tuned for the latest news, follow us on LinkedIn and Twitter! This article was made possible thanks to the expertise of our solution architect Eric Sauvé.


.png)